How To Sew Buttonholes
If you love sewing, there’s a fair chance you also love buttons. There are so many beautiful buttons, in an almost unlimited selection of shapes, sizes, colours and designs. One of the great things about them is that they provide an easy way to customise and personalise your garments. Different button styles can change the appearance of a garment almost as significantly as a different fabric. They can be quirky and fun, serious and business-like, or stylish and elegant.
However, just like their more utilitarian cousin the zip, buttons and buttonholes come with their own challenges when it comes to actually sewing them.
In this tutorial I’ll take you through the whole process of sewing buttons and buttonholes. We’ll start with how to place buttonholes on a garment, how to sew them with both a mid-range and basic sewing machine, how to cut the holes themselves (in three different ways!), and finally how to place and sew the buttons themselves.
If you’d rather watch a video than read a blog post, you’re in luck! Just click the video link below and you’ll see the whole process. (This video is an extract from my Southwick Skirt pattern tutorial ).
Otherwise, scroll past the video and read on…
Buttonhole Placement
Before we sew anything, we need to work out where our buttonholes will go. The process of marking these out is fairly long, but it will mean our buttonholes are placed evenly and are correctly aligned so that the button stands overlap perfectly and create a neat closure.

Start by deciding where your first button will go. For a skirt or trousers, this will usually be central to the waistband. Place a pin right at the edge of the button shank (or in line with the first hole if it doesn’t have a shank). This will mark where the button and the edge of the buttonhole will go.
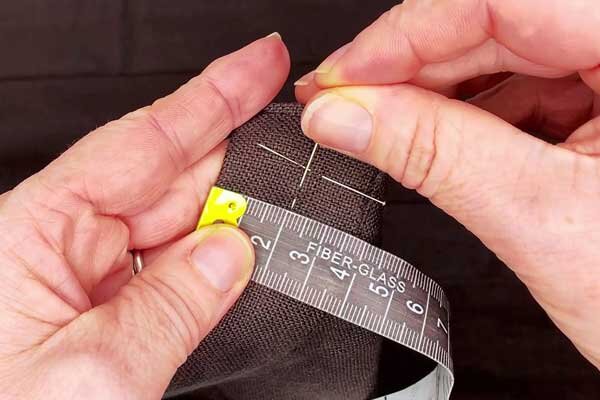
Place another pin perpendicular to the first pin, to mark the centre of the buttonhole. If on a waistband such as this example, measure to find the waistband centre and place the pin there. You’ll be left with a T shape formed by the pins, which will indicate the centre and one end of the buttonhole.

Now place a pin to mark the centre of the second buttonhole. You can choose any spacing from the first button that you like for this, based on the size of the button you will be using. It’s a good idea to place the button on the garment so that you can see if the spacing looks right.
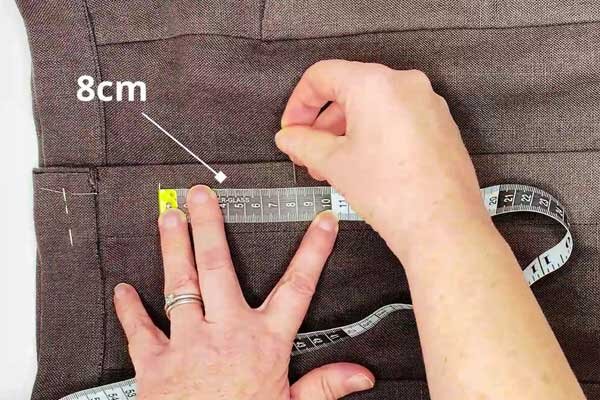
To place the rest of the buttonholes, measure a consistent amount between each button and place a pin. In this example, I’ve chosen an 8cm gap between each button.
If you want help working out the best button spacing, try our Button Spacing Calculator.

Keep going until you’ve marked out all the buttonhole positions.

Now we want to mark out the end of the buttonholes. To do this, place the button you’ll be using on the garment, at the correct distance from the button stand edge, and pop a pin through it as shown.

Then remove the button and slide the pin into the fabric perpendicular to the existing pin, forming a T shape, as we did with the very first button.

Mark the positions of the pins with some chalk.
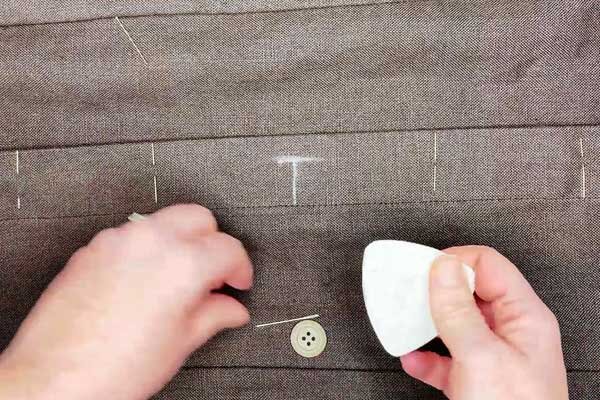
Then remove the pins and you should have a T shaped mark as shown above. Repeat the process for all the other buttonholes.
Sewing Buttonholes
Now it’s time to actually sew the buttonholes. I’ll be showing you two ways of doing this. The first uses a buttonhole foot. This is the kind of foot supplied with some mid-range domestic sewing machines. After that I’ll show you how to do it with my more basic machine that doesn’t have a buttonhole foot. The details will likely vary for your specific machine, so please consult your machine’s manual on the recommended buttonhole sewing process.

Before you sew a buttonhole on your actual garment, I strongly recommend you practice on a scrap. You’ll want to make sure you understand how your machine sews buttonholes and you’ll also need to test how large the button holes come out to ensure they are the correct size for the buttons you are using. So unless you really enjoy unpicking, try on an interfaced scrap first ;)
Sewing Buttonholes Using a Buttonhole Foot

This is an example of a buttonhole foot. This one is for a mid-range Elna machine.

To use the foot, you put the button you want to use into the slot at the top, then slide the top down so that the button is held firmly in place. Doing this will adjust the size of the buttonhole that will be sewn to match the size of the button. Or at least, that’s what it’s supposed to do. I’ve found that with my machine the buttonhole comes out too large if I do this, so I have to use a smaller button to get the correct size of buttonhole. Trying it out on a scrap allows us to discover these interesting little “features” before we let it loose on our actual garment!

When putting the buttonhole foot into the machine, we need to pull down a little guide lever from the machine itself. It is this lever, as it touches the side of the buttonhole foot, that controls the length of the buttonhole.

We then place the fabric under the buttonhole foot , aligning the needle with the cross in the T-shape we made on the fabric. After that we just press a button and off it goes! The whole process is automatic from then on.

Here’s a finished buttonhole, sewn using the buttonhole foot. Fancy, eh? Of course, not everyone has a machine like this, so how do you sew a buttonhole if you have a more basic machine?
Sewing Buttonholes Without a Buttonhole Foot

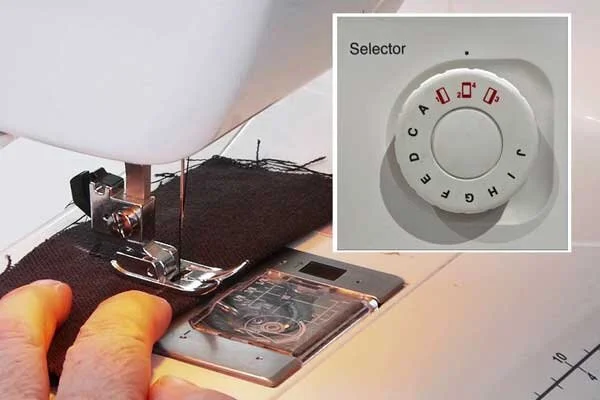
Here’s my old Janome 7021. No fancy stuff here, it’s a basic machine over a decade old. That’s not going to stop us sewing our buttonholes though! For a machine like this it’s a more manual process, and we’ll need to control the length of the buttonhole ourselves. As such, you’ll need to mark out both ends of the buttonhole, not just one, ensuring it is the correct size for the buttons you are using.

As I said earlier, the details of how the buttonhole process works will vary from machine to machine, but you’ll likely have a dial with positions that correspond to each step of the buttonhole sewing process. This machine actually starts by sewing forwards, so we need to align the needle with the far end of the buttonhole to start with. We then select Step 1 on the dial, and start sewing until we reach the other end of the buttonhole.
Once at the end, we turn the dial to Step 2, and this will sew along the end of the buttonhole forming the bar tack.

Once that is complete, we then switch to Step 3 and sew backwards until the end of the buttonhole again.

And finally switch the dial to Step 4 and sew the bar tack at the other end of the buttonhole.

That’s it - done! Not quite as neat as the automatic process, but perfectly serviceable.

As a final step, just check the sizing of your buttonholes. If all looks okay, like it does here, then you can go ahead and sew the buttonholes on your actual garment. It should sit snuggly inside those bar tacks at either end of the buttonhole. If it doesn’t, then go back and try again until you are happy with the result.
How To Cut Holes in Buttonholes
You may have noticed that our buttonholes are currently lacking a vital feature - holes! There are many ways of cutting the actual holes in a buttonhole. The main trick is to avoid cutting too far and slicing through the thread. Here are three different methods you can try, each produces a perfectly good result - take your pick!
Cutting Buttonholes with Scissors

The simplest method is to just use scissors. To do this, fold the buttonhole in half.
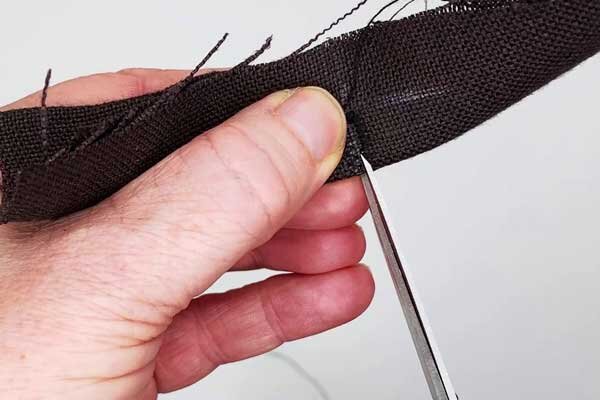
Then make a snip where the centre of the buttonhole will be.

Unfold the buttonhole, then slide the scissors into the hole and cut toward either end, one at a time, being careful not to go too far and snip the thread.
Cutting Buttonholes with a Buttenhole Chisel

Until recently I didn’t know these things existed. This is a buttonhole chisel, which is designed specifically for the job of cutting buttonholes. My one came with a cute little cutting mat, which is frankly adorable.

Simply place the buttonhole over the cutting mat, then push the chisel into the buttonhole, rocking it to and fro to cut through the fabric. You may find you have a few straggly threads left behind, depending on your fabric. If so, just trim them away with scissors.
Cutting Buttonholes with an Unpicker

My preferred method (prior to the chisel), was to cut holes using an unpicker. To do this, you first need to prepare the buttonhole to ensure you don’t accidentally rip through the ends with the unpicker. To do this, place pins across the buttonholes, just before the thread at the ends, as shown.

You can push the unpicker into the centre of the buttonhole and cut straight through the fabric up to the pins.

Whichever method you choose, you should end up with a nice neat buttonhole.
How to Place the Buttons
So, we now have a nice row of neat and uniform buttonholes. We don’t, however, have any buttons. But before we sew them on we need to ensure we’ll be sewing them in the correct position. Here’s how I like to do this.

Pin the button stands together, so that they are neatly aligned with each other.

Pop a pin through the buttonhole, right at the end where the button should sit once it’s been pushed through.

Locate the point on the underneath button stand where the pin goes through and place another pin perpendicular to it, as shown. This will indicate the correct position to sew the button. Repeat this for all the buttonholes.

Mark the point on the fabric were the pins are pushed through with some chalk and remove the pins.

Then align the button with the chalk mark and sew it on. If you want to do this with a machine…
Sewing The Buttons

Place the button on the fabric, under the foot as shown. use a zig-zag stitch such that the needle moves from side to side, going through each hole in the button in turn. You’ll need to hand wheel it at first to make sure the stitch is the correct width to go through each hole in the button.

It should look something like this. Of course, you can also use my preferred method which is a cup of tea and some relaxing hand sewing :)

That’s it, you’re done. You should now have a beautiful row of buttons and buttonholes.
If you found this post useful, we’d love it if you shared it.
Thank you for reading and I hope you have fun with your buttons :)

Sussex Seamstress is an independent pattern maker, based in Sussex, UK.
While you’re here, why not take a look at my range of sewing patterns for women?